Paleo Twix Bar

by | Nov 9, 2016 | 3 comments

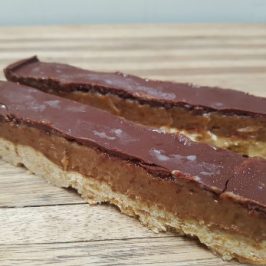
Introducing the real food 'Twix Bar'! This tastes just like the real thing only better! No nasty ingredients in this little tasty treat.

Yields1 Serving
Base
 1/2 cup Coconut Flour
 2 tbsp Arrowroot Flour
 150 g Organic Grassfed Butter*, melted
 1 tsp Vanilla Essence
Caramel Filling
 1 cup Changing Habits Dates soaked in hot water for approx. 20mins until soft
 1/4 cup Coconut Cream
 1 tsp Vanilla Essence
 30 g Organic Grassfed Butter*, melted
Chocolate Top
 2 tbsp coconut oil
 2 tbsp Maple syrup, Homemade Maleo or honey ( we used maple syrup)
1

Preheat oven to 180°C (or 160° fan-forced) Line a tray with baking paper

2

Mix together the coconut flour, arrowroot and salt in a large bowl. In a smaller bowl mix together the butter, sugar and vanilla.

3

Combine the butter mixture with the flour mixture, until fully mixed thorough and it looks like a thick, wet dough

4

Pat the dough into your prepared tray until even. Bake for 8-10 minutes, until light golden brown.

5

While the base is baking, prepare the caramel filling. Blend the dates, coconut cream, vanilla and butter until a nice thick creamy consistency.

6

When the base is cooked, take out of oven and allow to cool.

7

Spread the caramel on top of the base evenly and transfer the tray to the freezer to firm.

8

To make the chocolate topping, put the cacao melts and coconut oil in small saucepan on low heat until melted, then add sweetener of choice and stir through until smooth.

9

Take the tray out of the freezer and pour the chocolate on top of the set caramel layer. Pop back into the freezer until chocolate sets.

10

Using a hot knife cut into slices or squares of desired size. Enjoy!

11

Store leftovers in fridge or the freezer to keep firm.

[cooked-sharing]

Ingredients

Base
 1/2 cup Coconut Flour
 2 tbsp Arrowroot Flour
 150 g Organic Grassfed Butter*, melted
 1 tsp Vanilla Essence
Caramel Filling
 1 cup Changing Habits Dates soaked in hot water for approx. 20mins until soft
 1/4 cup Coconut Cream
 1 tsp Vanilla Essence
 30 g Organic Grassfed Butter*, melted
Chocolate Top
 2 tbsp coconut oil
 2 tbsp Maple syrup, Homemade Maleo or honey ( we used maple syrup)

Directions

1

Preheat oven to 180°C (or 160° fan-forced) Line a tray with baking paper

2

Mix together the coconut flour, arrowroot and salt in a large bowl. In a smaller bowl mix together the butter, sugar and vanilla.

3

Combine the butter mixture with the flour mixture, until fully mixed thorough and it looks like a thick, wet dough

4

Pat the dough into your prepared tray until even. Bake for 8-10 minutes, until light golden brown.

5

While the base is baking, prepare the caramel filling. Blend the dates, coconut cream, vanilla and butter until a nice thick creamy consistency.

6

When the base is cooked, take out of oven and allow to cool.

7

Spread the caramel on top of the base evenly and transfer the tray to the freezer to firm.

8

To make the chocolate topping, put the cacao melts and coconut oil in small saucepan on low heat until melted, then add sweetener of choice and stir through until smooth.

9

Take the tray out of the freezer and pour the chocolate on top of the set caramel layer. Pop back into the freezer until chocolate sets.

10

Using a hot knife cut into slices or squares of desired size. Enjoy!

11

Store leftovers in fridge or the freezer to keep firm.
Notes

Paleo Twix Bar
VIP Club featured

You May Also Like…

Inner Glow Berry Whip

Inner Glow Berry Whip

Cool off this summer with a simple 4-ingredient recipe that’s both nourishing and delicious!
Packed with the natural goodness of Inner Glow, this treat will leave you glowing inside and out.

3 Comments
  1. Holly

    I used this base for another slice recipe & it’s easy & gorgeous! Although I think the coconut flour quantity is incorrect – I needed to use 1.5 cups.

    Reply
    • Kayla-Changing Habits

      Hi Holly, glad you enjoyed it! The amount of coconut flour we have outlined in the recipe is definitely correct (we’ve made this recipe more than a few times—how can you not!). However, the dough is quite wet before baking which may have seemed off to you. Happy it worked out anyhow!

      Reply
  2. Holly

    Oh ok, thanks. Next time I’ll be brave and try to proceed with the wet batter.

    Reply

Submit a Comment

Your email address will not be published. Required fields are marked *

My cart
Your cart is empty.

Looks like you haven't made a choice yet.